π0 Review
· 4 min read

π0
Problem & Motivation
- Achieving real-world generality in robot learning is blocked by data scarcity, generalization, and robustness limits.
- Human intelligence most outpaces machines in versatility—solving diverse, physically situated tasks under constraints, language commands, and perturbations.
- In NLP/CV, foundation models pre-trained on diverse multi-task data, then fine-tuned (aligned) on curated datasets, outperform narrow specialists; the same paradigm is hypothesized for robotics.
Core Proposal
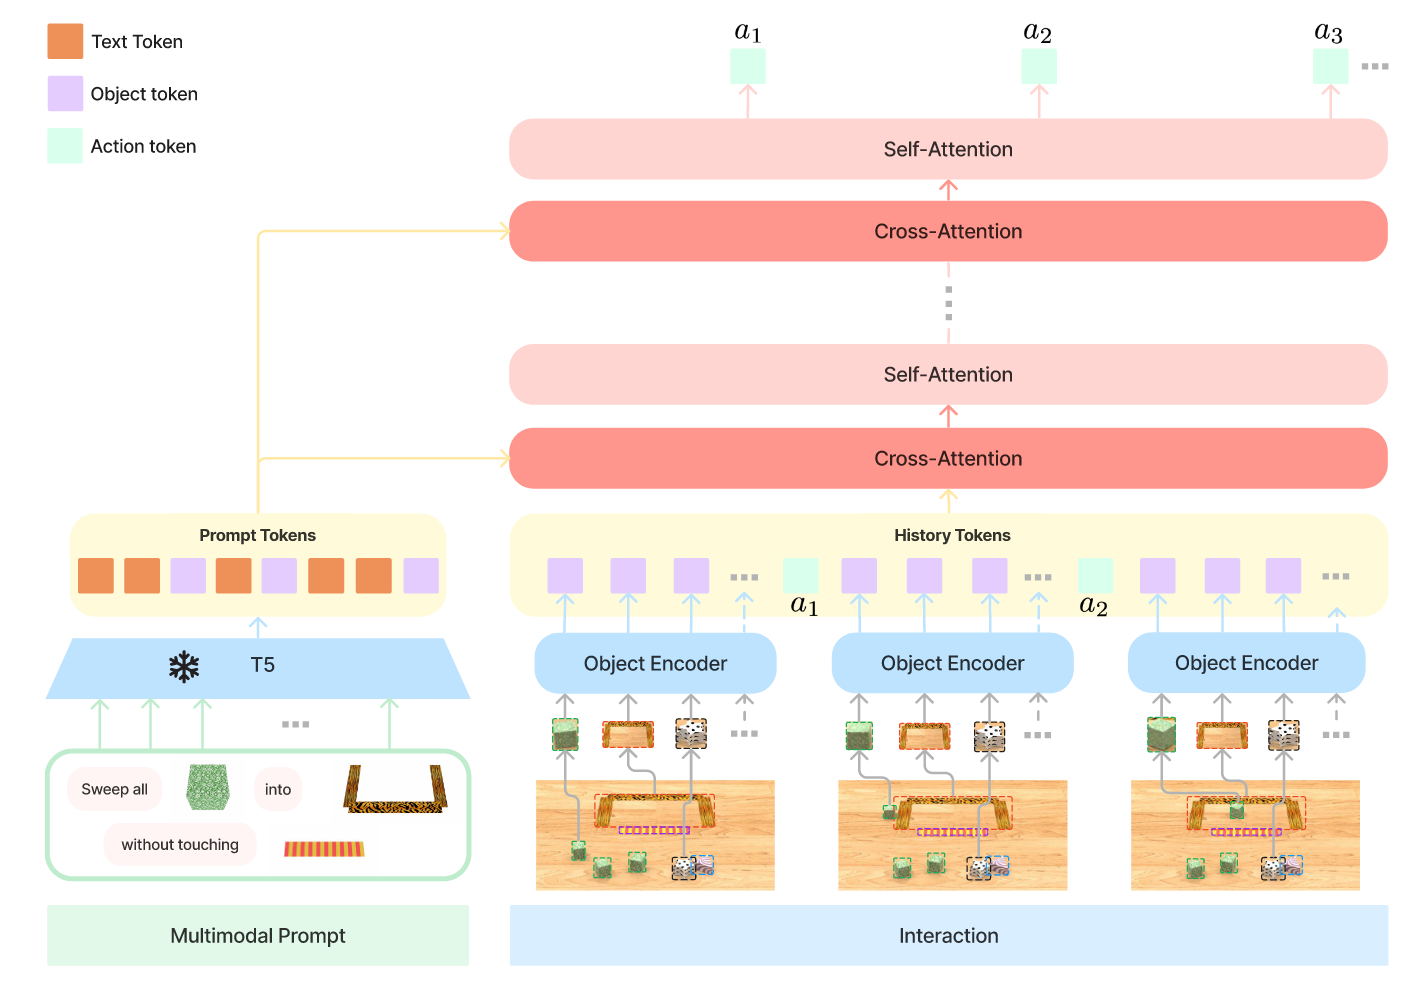
- A novel flow-matching architecture built on a pre-trained Vision-Language Model (VLM) to inherit Internet-scale semantics.
- Further training adds robot actions, turning the model into a Vision-Language-Action (VLA) policy.
- Use cross-embodiment training to combine data from many robot types (single/dual-arm, mobile), despite differing configuration/action spaces.
- Employ action chunking + flow matching (diffusion variant) to model complex, continuous, high-frequency actions.
- Introduce an Action Expert (separate weights for action/state tokens), akin to a Mixture-of-Experts, augmenting the standard VLM.
Training Recipe (Pre- vs Post-Training)
- Pre-training on highly diverse data builds broad, general physical abilities.
- Post-training on curated, task-specific data instills fluent, efficient strategies.
- Rationale: high-quality-only training lacks recovery behaviors; low-quality-only training lacks efficiency/robustness; combining both yields desired behavior.
Data & Backbone
- ~10,000 hours of demonstrations + the OXE dataset; data spans 7 robot configurations and 68 tasks.
- VLM backbone initialized from PaliGemma (3B); add ~300M parameters for the action expert (total ~3.3B).
- Pre-training mixture: weighted combination of internal datasets + full OXE; n^0.43 weighting to down-weight overrepresented task-robot pairs.
- Unify interfaces: zero-pad qt/at to the largest robot dimension (18); mask missing image slots; late-fusion encoders map images/states to the same token space as language.
Modeling Details
- Conditional flow matching models the continuous distribution over action chunks.
- Train with a diffusion-style loss on individual sequence elements (instead of cross-entropy), with separate weights for diffusion-related tokens.
- Flow path uses a linear-Gaussian schedule; sample noisy actions with ε∼N(0, I); predict denoising vector field; Euler integration from τ=0→1 at inference.
- Efficient inference by caching K/V for the observation prefix; action tokens recomputed per integration step.
High-Level Language Policy
- Because the policy consumes language, a high-level VLM can decompose tasks (e.g., bussing) into intermediate language subgoals (SayCan-style planning), improving performance on complex, temporally extended tasks.
Evaluation Setup & Baselines
- Out-of-box (direct prompting), fine-tuning on downstream tasks, and with high-level VLM providing intermediate commands.
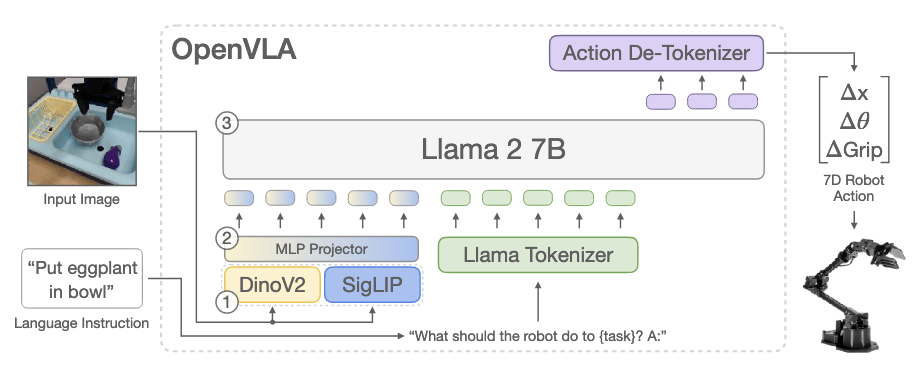
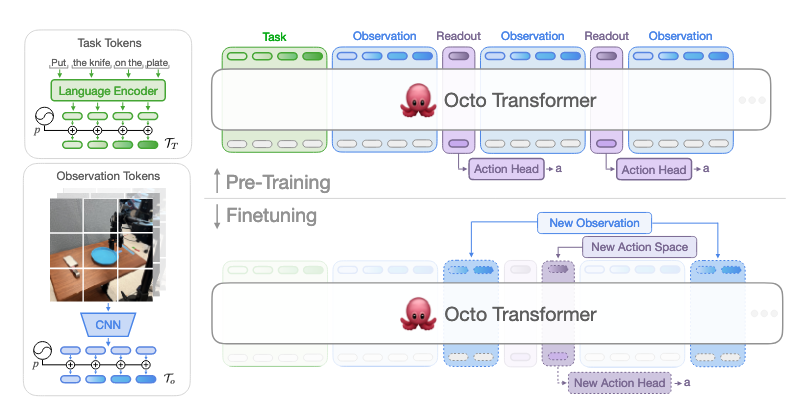
- Compare against OpenVLA (7B, autoregressive discretization; no action chunks/high-frequency control) and Octo (93M; diffusion), trained on the same mixture.
- Include a compute-parity π0 (160k steps vs 700k) and a π0-small variant (no VLM init).
Key Results
- Out-of-box: π0 outperforms all baselines; even compute-parity π0 beats OpenVLA/Octo; π0-small still surpasses them—highlighting the benefits of expressive architectures + diffusion/flow matching + VLM pre-training.
- Language following: π0 clearly exceeds π0-small across conditions:
- π0-flat: only overall task command.
- π0-human: human-provided intermediate steps.
- π0-HL: high-level VLM-provided steps (fully autonomous).
- Better language-following accuracy directly translates into stronger autonomous performance with high-level guidance.
- New dexterous tasks (e.g., bowls stacking, towel folding, microwave, drawer items, paper towel replacement):
- Fine-tuned π0 generally outperforms OpenVLA, Octo, and small-data methods ACT / Diffusion Policy.
- Pre-training helps most when tasks resemble pre-training data; pretrained π0 often beats from-scratch by up to 2×.
- Complex multi-stage tasks (laundry folding, table bussing, box building, to-go box, eggs):
- π0 solves many tasks; full pre-training + fine-tuning performs best.
- Gains from pre-training are especially large on harder tasks; absolute performance varies with task difficulty and pre-training coverage.
Takeaways & Limitations
- π0 mirrors LLM training: pre-train for knowledge, post-train for alignment (instruction-following and execution).
- Limitations/open questions:
- Optimal composition/weighting of pre-training data remains unclear.
- Not all tasks work reliably; difficult to predict how much/what kind of data is needed for near-perfect performance.
- Uncertain positive transfer across very diverse tasks/robots and to distinct domains (e.g., driving, navigation, legged locomotion).
Ref
- Black, K., Brown, N., Driess, D., Esmail, A., Equi, M., Finn, C., Fusai, N., Groom, L., Hausman, K., Ichter, B., Jakubczak, S., Jones, T., Ke, L., Levine, S., Li‑Bell, A., Mothukuri, M., Nair, S., Pertsch, K., Shi, L. X, … Zhilinsky, U. (2025, June 21). π₀: A vision‑language‑action flow model for general robot control Robotics: Science and Systems (RSS), Los Angeles, CA, United States.
https://roboticsconference.org/program/papers/10/